Showing posts with label DIY. Show all posts

Whiskey Craft Night


Sometimes I like to craft. Sometimes I like to drink. Sometimes I combine the two. 
Thus my Whiskey Craft Night.

For this project all you need are bottles (new, old, big, litte...whatever you'd like), pictures, paint, and mod podge. Just paint your bottles and use the mod podge to glue on the photos. So simple, you can drink when you do it!

Read more...

DIY: BEWARE

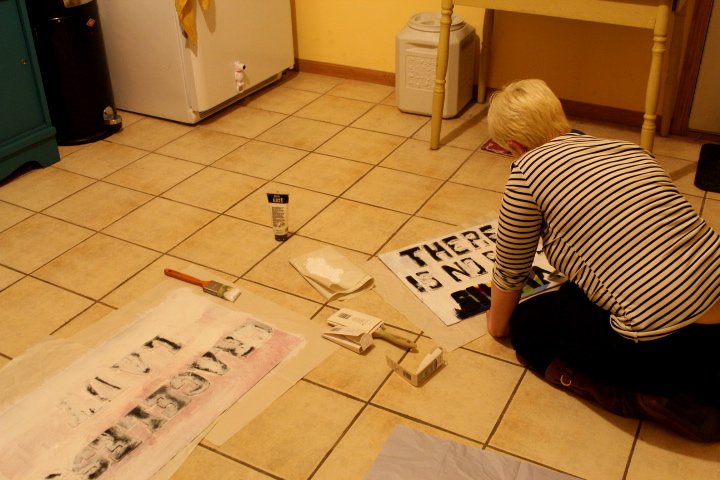
Saturday seemed like the perfect day to stroll through Logan Square and get a little crafty.  So I did just that with Piper.

Last week she came to me with with the Quote/ Lyric DIY project that seems to be floating around the net. It seemed simple enough so we set out to conquer this little project.


 Here are the "basic" instructions:

1)Find a simple painting you want for your letter back drop
2)Pick up paint (your color choice, though white looks best) and stick on letters 
3)Stick letters to painting in a saying/quote/lyric you like
4)Paint over letters
5)Once dry peel off letters...and you're done!

 2)


3)


4)


5)


We discovered it's not that easy. Turns out our "go to" thrift stores did not have a lot of painting options. We stopped at 3 or 4 places before we found backdrops we really liked. Most DIY instructions listed that the stick on letters could be found at any hardware store. Not the case- Home Depot does not carry them. We found some at Joann's, but they didn't have the exact size we wanted. When I painted over mine with white paint, the photo beneath bled thru and turned my white paint to pink. Note: Use an actual painting and not something on photo paper. I ended up painting over mine in yellow to get rid of the pink.

All in all it was an interesting experience. I really like how Pipers turned out, I have yet to see mine in person because it took forever to dry. Piper was nice enough to peel my letters off and snap me a picture on her phone. So beware, and don't get frustrated when seemingly simple projects turn into marathons!


Read more...

DIY Framed Necklace Holder

I love the idea of keeping jewelery on display, but I hate it when things look cluttered. I've been slightly obsessed with collecting longer necklaces as of late and find those are the hardest to display with out things ending in a tangled mess. So I put together this super cute, super simple necklace holder. I first ran across these "framed" necklace holders about a year ago and have wanted to make one every since. Here we go!

What you need:
Picture Frame (any size,  or color)
Paint/spray paint
Nails and hammer
Step 2: Hammer nails into frame.
Depending on how many necklaces you have, evenly space your nails.
Step 3: Paint the frame.
My frame was originally gold. I wanted something a little more shabby chic, so I painted it white. 

Step 4: Hang and add necklaces. And your DONE!
 

See?? Super simple, super cute! Enjoy making your own...
❤❤


Read more...

Just because

Just because you had a productive day...
DIY for the ones you love.

Step 1: collect sweets
Step 2: Express your self.
 I've been into Pablo Neruda for a bit, he's always been my go to when I've lost my way with words.
Step 3: Packaging. 
I always have some sort of yarn or ribbon lying around. Everything looks better with a bit of dressing.
Step 4: Deliver. 
I like to type up little "Hello" notes with clues on them that eventually leads to the goodies. Nothing better then some sweets after a little hunt.

❤❤

Read more...

  © Blogger template Shush by Ourblogtemplates.com 2009

Back to TOP